How to Efficiently Integrate Water Level Sensors into IoT Water Monitoring Systems
Water shortage is a critical issue affecting billions of people worldwide. Therefore, we urgently need smart, scalable solutions.
Integrating Water Level Sensors into an IoT (Internet of Things) system allows you to monitor water levels in real-time, automate processes, prevent water loss, and optimize resource utilization. Let's explore the easy-to-understand steps and methods together.
Why is IoT Technology Crucial for Water Level Monitoring?
Traditional water monitoring methods waste both time and budget. According to EPA data, an average American home loses 9,400 gallons of water annually due to leaks. However, adopting IoT will completely change these statistics:
- Effective Water Management: Provides real-time data. The Smart Water Management market is expected to grow to $61.7 billion by 2034, reflecting that businesses are realizing the importance of investing in IoT.
- Instant Alerts: When a problem occurs, you receive immediate notifications. Installing smart sensors can save up to 400 million gallons of water a year and massively reduce costs through highly effective oversight.
How Does an IoT Water Monitoring System Work?
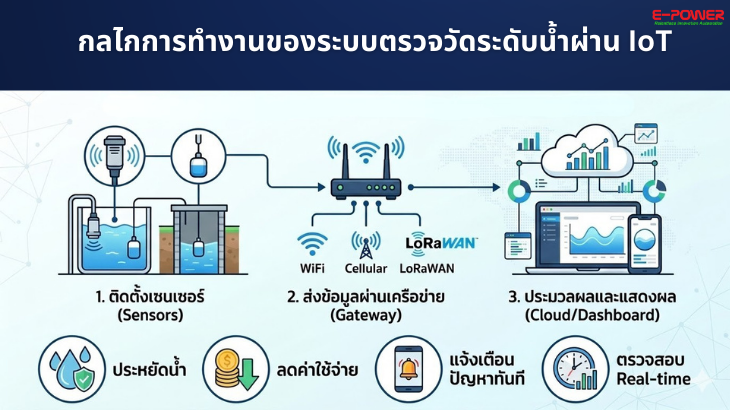
An IoT water monitoring system uses the internet to connect sensors to a Cloud Platform. The Water Level Sensor continuously tracks and measures the water level. The data is then sent to Dashboards that you can access and check at any time.
This system operates through 3 main components:
- Sensors: Measure water levels using various technologies such as Ultrasonic, Pressure, or Radar.
- Gateway: Forwards data from the sensors via WiFi, Cellular, or long-range wireless networks like LoRaWAN.
- Cloud Platform: Processes, analyzes, and displays all data (Data Visualization) in an easy-to-understand format.
Key Takeaway: IoT-enabled water management solutions can reduce operational costs by up to 30%, helping you save budget, increase data accuracy, and completely eliminate the burden of manual readings.
Choosing the Appropriate Water Level Sensor
The accuracy of the entire system depends on your sensor selection. Currently, there are 3 main types dominating the market:
- Ultrasonic Sensors: Use sound waves to measure distance with high precision up to +/- 2.5 cm. Suitable for general applications, they must be installed above the water surface (Non-contact).
- Pressure Transducers: Measure water levels by being submerged directly in the water. Designed to withstand harsh environments, they are ideal for deep wells and large industrial water tanks.
- Radar Sensors: Use electromagnetic waves. They are more expensive but may have limitations if thick foam or vapor interferes with the actual water level measurement.
Step-by-Step Installation of an IoT Water Monitoring System
Step 1: Evaluate Your Needs
List what you want to monitor, such as tank capacity, reservoir depth, or multiple installation points. Specify measuring intervals and environmental factors. Do not forget to consider the power source: Remote areas should use solar panels, while city locations can use mains power. Be mindful of battery life for wireless sensors.
Step 2: Choose the Connectivity Protocol
Choose the appropriate communication medium:
- LoRaWAN and Sigfox: Stand out for battery savings and cost-effective module prices (averaging 15.7% CAGR). Ideal for remote meters and underground installations.
- NB-IoT: Uses cellular networks. Suitable for urban areas with signal coverage.
- WiFi: Best for short distances requiring high bandwidth.
Step 3: Hardware Components Installation
Install the Water Level Sensor in the optimal location. Ultrasonic sensors must have a clear line of sight to the water surface, while pressure sensors must be at the bottom of the tank. Then, connect to a Gateway or popular microcontrollers like Arduino, ESP32, or Raspberry Pi. Caution: Make sure all connection points are properly waterproofed.
Step 4: Set Up the Cloud Platform
Select an IoT platform that meets your needs, such as ThingsBoard, AWS, or Azure IoT (ThingsBoard features dashboards that allow end-users to easily view their meter data). Then, add your devices to the system, set up security, and manage historical data storage.
Step 5: Program the Data Flow
Write code for the sensor to read values and send data to the cloud in real-time. Convert digital or analog signals into understandable units (e.g., centimeters). Don't forget Error Handling: Networks can go down; configure the system to save data in a local buffer to prevent data loss.
Step 6: Create Dashboards & Alerts
Use graphs, gauges, and maps to display current water levels and historical usage trends. Set Threshold Alerts to receive immediate notifications via email or SMS when water levels fall below or exceed predefined limits.
Step 7: Calibrate and Test
Sensors become more accurate (up to ±0.3 cm) when calibrated against a known reference (ultrasonic values often vary with temperature, requiring compensation formulas). Testing: Try filling and draining the tank to check accuracy and verify that the alert system actually works.
Step 8: Deploy and Monitor
Start with a Pilot Project to identify flaws before a full-scale rollout. Train staff to use the dashboard and perform regular sensor maintenance (clean quarterly, check water levels monthly).
Advantages of Using an IoT Water Monitoring System
- Real-time visibility: Transforms your operational model. You will spot leaks instantly and plan maintenance before the system fails. (The IoT market in water management is expected to grow from $10.29 billion in 2024 to $11.8 billion in 2025).
- Remote control and time-saving: View the status of multiple sites on a single screen, reducing field visits for employees.
- Historical trend analysis: Identify peak usage times (Peak times) to strategically plan system upgrades and manage resources sustainably.
Common Installation Problems and Solutions
Problem: No internet access in remote areas.
Solution: Use LoRaWAN or Satellite systems instead of cellular networks.
Problem: Sensor performance drops or values drift over time.
Solution: Perform regular calibration and maintenance to reduce the risk of false alarms.
Conclusion
Building an IoT Water Monitoring System is not out of reach. You can start small with just one water tank, install a Water Level Sensor and basic hardware, and gradually scale up. Although the initial cost may seem high, you will quickly recover it by preventing water leaks.
Technology has advanced significantly; sensors are cheaper, and batteries last longer. What might have required a 50,000 investment 5 years ago might now cost only 10,000 for a basic setup. The crucial thing is do not neglect calibration, as a substandard or uncalibrated sensor will provide faulty data.
Step into smarter water management—choose a high-quality Water Level Sensor from Rika Sensor to power your IoT water monitoring system with maximum accuracy and confidence.

 in Waste Water Treatment Plant Management By num2002")
